
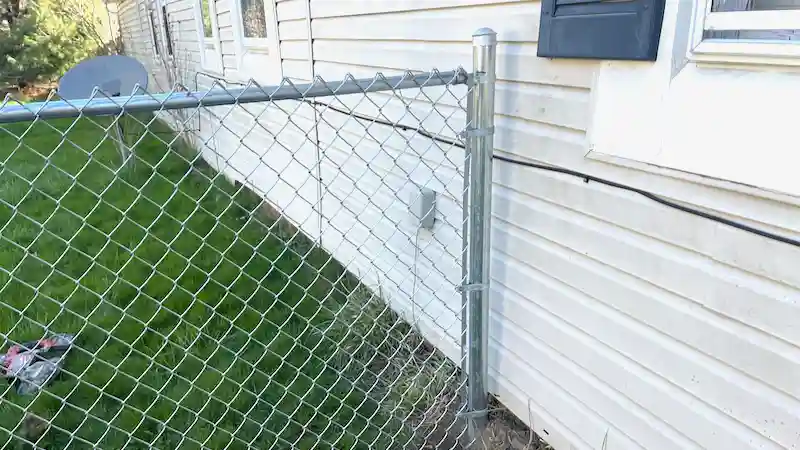
A chain link fence is an affordable and easy-to-install fencing option that can provide security, pet containment and privacy to your property. Chain link fences come in different heights, colors and gauges, making them versatile enough to fit any property.
In this article, we will guide you through the step-by-step process of installing a chain link fence.
Laying out the Fence Lines for Installing a Chain Link Fence
The first step in installing a chain link fence is to lay out the fence lines. This involves measuring and marking the area where you want the fence to be installed.
Start by marking the corners of the fence with stakes and string. This is where the terminal posts will go. Then, use a measuring tape to mark the location of the remaining fence posts, known as Lin posts, along the string line.
Make sure that the spacing between each line post is consistent, typically between 8 to 10 feet apart, depending on the length of each run.
Purchase the Correct Amount of Chain Link Materials
It is essential to purchase the correct amount of fencing materials when installing a chain link fence to avoid delays or additional expenses. Underestimating the amount of materials needed can result in having to stop the installation process and purchase additional materials, causing unnecessary delays and adding to the overall cost of the project.
On the other hand, overestimating the amount of materials needed can lead to wasted materials and increased expenses. Additionally, having insufficient materials can compromise the safety and stability of the fence, leaving it vulnerable to damage and potential collapse.
It is crucial to accurately measure the area where the fence will be installed and purchase the appropriate amount of materials to ensure a smooth and safe process when installing a chain link fence.
Tools for Installing a Chain Link Fence
There are several tools required for installing a chain link fence, and having the right tools is essential for a smooth and efficient installation process. Some of the essential tools include a post hole digger, shovel, level, string, measuring tape, pliers, wire cutters and hammer.
A post hole digger is used to dig holes for the fence posts, while a shovel is used to remove dirt and debris.
The level ensures that the posts are set at the proper alignment, while pliers and wire cutters are used to manipulate and cut the fabric.
The hammer is used to drive posts and stakes, for attaching the string.The string line keeps the fence post straight and true. Having all of the necessary tools on hand before beginning the installation process can save time and minimize disruptions.
Tool for Setting Chain Link Posts
Before installing a chain link fence, you will need to set the fence posts. The tools you will need for this process include a post hole digger, a shovel, a level, and a measuring tape.
If you are setting the posts in concrete, you will also need bags of concrete mix, a wheelbarrow, and a mixing tool.
Tools for Stretching Chain Link Fabric
After the fence posts are set, you will need to stretch the fabric. The tools you will need for this process include a hand stretcher or come-along, a stretch bar or tension bar, fence pliers and hacksaw.
Installing Chain Link Fence Posts
There are two methods to install posts when installing a chain link fence: concreting or driving the fence posts. Concreting the fence posts is the more durable option but takes longer to set up, while driving the posts is faster but not as sturdy in some soil conditions. Check with your local building department regarding permit requirements for chain link installation before choosing an installation method.
Setting Chain Link Fence Posts in Concrete
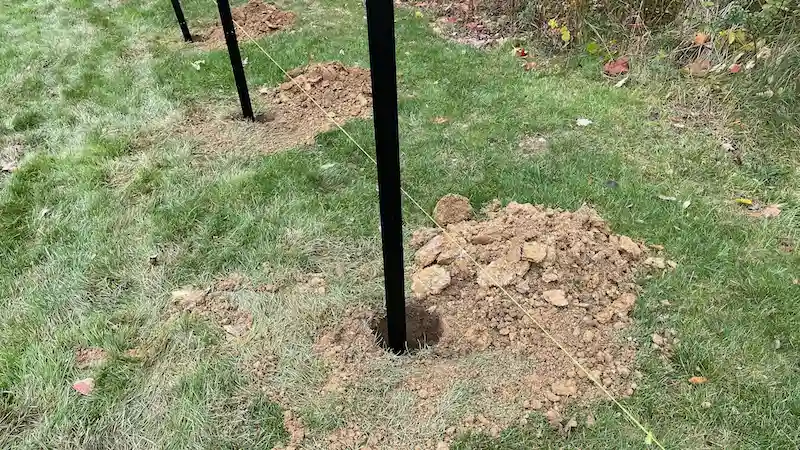
To concrete the fence posts, dig a hole using a post hole digger to a depth of at least one-third of the post’s length. Place the fence post in the hole, making sure it is level, and then pour concrete mix around the fence post holes. Allow the concrete to dry completely before proceeding to the next step.
Installing Fence Post Using Wet Concrete Mix
Setting posts using wet mix concrete is a popular method that provides a strong and durable foundation for the fence. The first step is to dig a hole for the post using a post hole digger, making sure that the hole is deep enough to support the height of the post.
Next, mix the concrete according to the manufacturer’s instructions, adding water to create a wet mix. Once the concrete is mixed, pour it into the hole, making sure that the post is centered and level. Use a level to ensure that the post is perfectly straight.
Allow the concrete to dry for several days. Setting fence posts using wet mix concrete when installing a chain link fence requires careful planning and attention to detail, as it is important to ensure that the posts are set at the correct depth to provide maximum stability for the fence.
With the right tools and techniques, setting posts using wet mix concrete can be a relatively simple and straightforward process for installing a chain link fence.
Installing Fence Posts Using Dry Concrete Mix
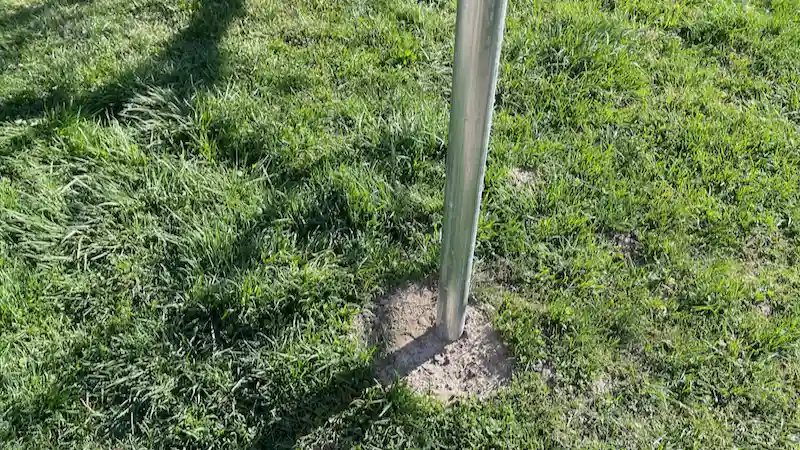
Setting fence posts using dry mix concrete is another popular method that can provide a strong and stable foundation for the fence. The first step is to dig a hole for the post using a post hole digger, making sure that the hole is deep enough to support the height of the post.
Next, pour the dry mix concrete into the hole, making sure that the post is centered and level. Use a level to ensure that the post is perfectly straight and inline with the string line, and then add water to the hole using a garden hose or watering can.
Allow the water to soak into the concrete, and then mix it using a shovel or trowel. Continue to add water and mix the concrete until it is fully hydrated and has a thick, mud-like consistency.
Once the concrete is mixed, allow it to dry for several days. Once the concrete has dried, you can continue with the rest of the chain link fence installation.
Setting posts using dry mix concrete can be a quick and easy process for setting posts when installing and chain link fence, as it does not require the same level of preparation as wet mix concrete. However, it is important to ensure that the dry mix is properly hydrated, as this will ensure that the concrete is strong and durable enough to support the fence.
Additionally, it is important to use the right amount of water, as too little water can result in weak and brittle concrete, while too much water can result in soft and unstable concrete.
Driving Chain Link Fence Posts
To drive the fence posts when installing a chain link fence, use a post driver or a sledgehammer to pound the post into the ground. Make sure that the post is level to the string line and at the correct height. To keep the post from bending, you can use a wooden block to cushion the blow of the hammer.
Installing posts using a post driver is a popular method that can save time and effort compared to traditional methods of installing a chain link fence such as digging and pouring concrete.
A post driver is a tool that uses a heavy weight to drive the post into the ground, creating a strong and stable foundation for the fence. The first step is to mark the location of each post using a string line or other marking tool, making sure that the posts are spaced evenly and at the correct distance apart.
To use the post driver, place it over the top of the post and lift it up, allowing the weight to drop and drive the post into the ground. Repeat this process until the post is at the correct depth and fully seated in the ground.
It is important to make sure that the post is straight and level as you drive it into the ground, as this will ensure that the fence is properly aligned and stable.
Once all of the posts are in place, you can begin attaching the fence fabric to the posts using fence ties or other fasteners.
Installing a chain link fence using a post driver can be a quick and effective method, but it is important to use the right equipment and follow proper safety procedures to avoid injury or damage to the posts.
Setting Chain Link Fence Terminal Posts
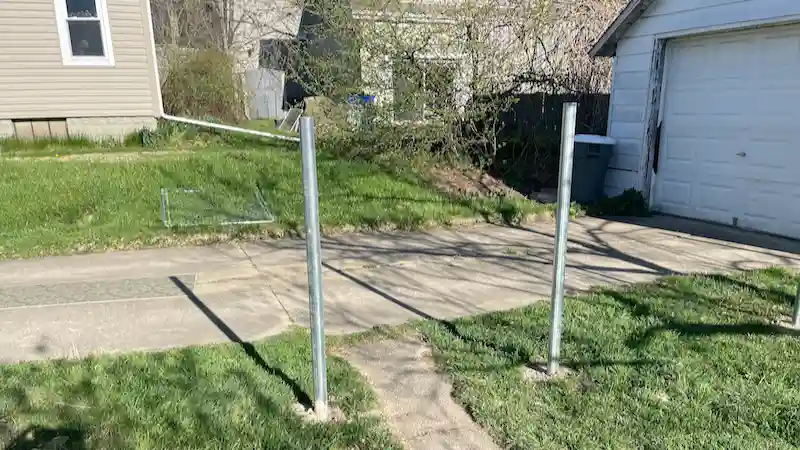
Terminal posts are the end posts, corner posts and gate posts. The first step when setting terminal posts when installing a chain link fence is to determine the location of the fence and mark the spot for each terminal post. Then, dig a hole for each post using a post hole digger, making sure that the holes are deep enough to support the height of the fence.
Insert each terminal post into the hole and use a level to ensure that it is perfectly straight. Fill the hole with concrete, tamping down the concrete to ensure that the post is secure and stable.
Installing the Line Posts
Installing line posts of chain link fencing requires similar steps as installing terminal posts, with some minor differences. First, determine the location of the line posts and mark each spot.
Then, use a post hole digger to dig the holes for the line posts, ensuring that the holes are deep enough to support the height of the fence. Insert each line post into the hole, making sure that it is perfectly straight and level to the string line.
Fill the hole with concrete, tamping down the concrete to ensure that the post is secure and stable. Allow the concrete to dry.
Installing line posts requires careful planning and attention to detail, as it is essential when installing a chain link fence to ensure that they are installed at the correct distance and depth to support the fence fabric.
Allow Time for Concrete to Dry
It is important to let concrete dry before stretching chain link fence because the concrete provides the stability and support necessary to hold the fence in place. If the concrete is not allowed to dry completely, it may not be able to support the weight and tension of the fence, which can cause it to shift or even collapse overtime.
Additionally, if the concrete is still wet or soft when the fence is stretched, it may cause the terminal posts to shift or move, which can lead to an uneven or unstable fence.
By allowing the concrete to dry completely when installing a chain link fence, you can ensure that the fence is securely anchored in place, which will improve its durability and longevity.
While it may be tempting to rush the installation process, taking the time to let the concrete dry properly is essential for a successful and long-lasting chain link fence installation.
Installing Chain Link Fencing Fittings
Installing fittings onto chain link fence posts is a relatively simple process that can be completed using basic tools. However, it is important to make sure that the fittings are installed correctly to ensure that the fence is stable and secure.
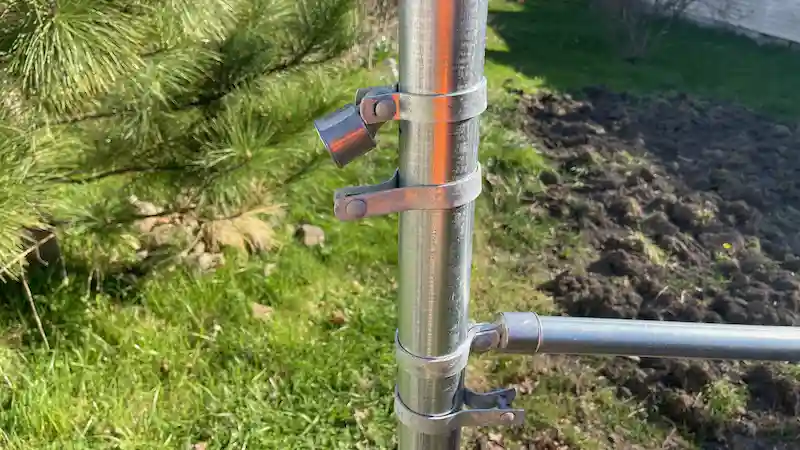
Terminal post fittings consist of a dome cap, brace bands, tension bands, rail ends a tension bars.
Loop caps are fittings that install on top of the line posts. Their job is to hold the top rail in place. They simple slide onto the top of the line posts. However, they are unidirectional and should face the side of the framework the fence fabric will be stretched on when installing a chain link fence.
Installing Chain Link Fence Top Rails

After the fence posts are set, you can begin installing the top rails. The top rails are the horizontal pipes that run along the top of the fence and provide support for the fence fabric.
To install the top rails, slide them through the loops on the fence line posts and secure them in place with rail end cups at each terminal post.
Installing Bottom Rail or Bottom tension wire
Chain link fencing bottom rail and bottom tension wire are important components that provide additional stability and support when installing a chain link fence.
The bottom rail is a horizontal bar that runs along the bottom of the fence fabric, providing added strength and stability to the fence. The bottom tension wire is a wire that is attached to the bottom of the fence fabric, helping to keep the fabric taut.
The benefits of using a bottom rail or bottom tension wire include improved durability and stability of the fence. By adding these components, the fence is less likely to sag or shift over time, even in windy conditions or under the weight of heavy snow or ice.
This helps to ensure that the fence remains functional and effective in its intended purpose, whether it is used to contain animals or secure a property.
Additionally, the use of a bottom rail and bottom tension wire can improve the overall appearance of the fence. By preventing sagging and ensuring that the fabric is properly tensioned, the fence looks neater and more professional, which can be especially important for commercial or public settings.
Bottom Tension Wire for Chain Link Fences
To prevent animals from digging or pushing under the fence, it is important to install a bottom wire. The bottom wire is a piece of wire that runs along the bottom of the fence between the terminal posts and is secured to the fence fabric with hog rings.
To install the bottom wire, unroll it along the ground next to the fence and attach it to the fence fabric using hog rings. A brace brand attaches bottom wire to each terminal post.
Bottom wire should be stretched tightly between terminal posts and tied to line post. Preventing the fence from being pushed or pulled upward away from the ground.
Bottom Rail for Chain Link Fences
Installing a chain link fence bottom rail is an important step in creating a stable and durable fence. Adding extra strength when compared to bottom tension wire.
Bottom rail should be installed along the bottom of the fence fabric between each line post and parallel to the ground. Measure and cut the bottom rail to the appropriate length using a saw or pipe cutter.
A special fitting called a boulevard clamp or line rail clamp attaches to the line posts and holds the bottom rails in place.
Secure bottom rail to the terminal posts using rail end cups and brace bands. Rail end cups are metal brackets that fit onto the end of the bottom rail and attach it to the terminal posts.
Finally, use tie wires or other fasteners to secure the bottom rail to the fence fabric.
How to Install the Wire Mesh
Stretching the chain link fence fabric is the next step in the installation process. To stretch the fabric, attach one end to a terminal post using a tension bar and a tension bands.
Then, unroll the fabric along the fence line and attach it to each line post. Use a come-along to pull the fabric tight, and then secure.
Rolling Out the Fence Fabric
Rolling out fabric is an important step when installing a chain link fence, as it helps ensure that the fence is properly aligned and tensioned. Here are the steps to follow to roll out chain link fence fabric:
Begin by unrolling the fence fabric along the fence line, starting at one terminal post and working your way to the next.
As you unroll the fence fabric, lean it against the framework of the fence. Try to pull slack out of the wire mesh as you go.
Use fence ties every so often to loosely attach the fabric to the top rail. Preventing it from falling over, while still allowing the fabric to slide when stretched. Do not attach to a line post.
How to Stretch Chain Link Fence
Stretching chain link fence fabric tight is an important step in creating a stable and secure fence. Here are the steps to follow to stretch fabric tight:
1. Begin by installing the fence fabric onto the framework, using tension bars and tension bands to secure it in place at one of the terminal posts.
2. Next, attach a come-along or other tensioning tool to the fence fabric, near the center of the first fence section at the opposite side of the stretch. With the other end of the come along attaching to the terminal post.
3. Using the tensioning tool, begin to pull the fence fabric tight, taking care to maintain even tension across the entire length of the fence. It helps to bounce the wire in multiple locations while stretching. This ensures the wire is stretched evenly.
4. As you pull the fence fabric tight, secure it to the terminal post using fence tension bands and a tension bar.
5. Once the fence fabric is properly tensioned and aligned, release the tensioning tool and add the appropriate fence tie wires to the top rail and line posts.
6. Repeat this process for each section of the fence, taking care to maintain proper tension between the terminal posts and alignment throughout the installation process.
Hand Stretching Chain Link Fence
Stretching fabric by hand when installing a chain link fence can be a viable option for small or simple installations.
The first step is to attach the fence fabric to the terminal post using a tension bar and tension bands. Place a tension bar through the end of the fabric and attach it to the post using tension bands.
Pull the fence as tight as possible using your hands or a hand stretcher. Repeat this process for each section of the fence until the entire fence is stretched and secured to the posts.
Stretching by hand requires patience and precision, but it can be a cost-effective alternative to using powered stretching equipment when installing a chain link fence.
Using a Pull Jack to Stretch Chain Link Fence
Stretching chain link fence using a pull jack is a popular method that is faster and more efficient than stretching by hand.
First, attach the fence fabric to the terminal post using a tension bar and tension bands. Then, attach a pull jack to the fabric using a tension bar and to opposite end terminal posts.
Once the pull jack is attached, use the handle to stretch the fence fabric until it is taut. Secure the end of the fabric to the terminal posts using tension bands and a tension bar, making sure that the fabric is evenly stretched.
Repeat this process for each section of the fence until the entire fence is stretched and secured to the posts. Pull jacks are powerful tools that can quickly and efficiently stretch chain link fence, making them a popular option for large installations.
However, it is important to exercise caution when using a pull jack, as they can generate significant force and cause injury or damage if used improperly.
Stretching Chain Link Fence with a Come-along

Stretching chain link fence using a come along is a simple and effective method that can be done without any special tools. Start by attaching the fence fabric to the terminal post using a tension bar and tension bands. Then, attach a come along tool to the fabric, using a tension bar and stretch bar about halfway into the first section of fence at the opposing end of the stretch. Attach the cable end to the opposite end post.
Using the come along handle, begin cranking to apply tension to the fabric. Keep cranking until the fabric is tight enough to be secured to the terminal posts with tension bands and a tension bar.
When installing a chain link fence it is important to make sure that the fence is evenly stretched, and that the tension is not too tight, as this can cause the fence to warp or bend. Bouncing the fabric helps to evenly disperse the tension over the length of the stretch.
Repeat this process for each section of the fence until the entire fence is stretched and secured to the terminal posts. Come alongs are affordable and widely available tools that can make the process of stretching chain link fence easier and faster.
Installing Fence Ties to Secure Chain Link Fabric to Framework
Installing aluminum fence ties is a crucial step in attaching the chain link fabric to the framework. Aluminum fence ties are pieces of wire that wrap around the top rail and the chain link mesh, securing them to the fence posts.
To install the fence ties, start at one end of the fence and work your way down. Slide the fence tie over the top rail or to one side of the fence post securing it to the the chain link fabric. Use pliers to wrap the tie around the pipe framework and attach it to the fabric on the other side.
Make sure that the fence tie is tight and secure, as this will ensure that the chain link mesh stays in place. Repeat this process for every section of the fence until the entire fence is secured to the framework.
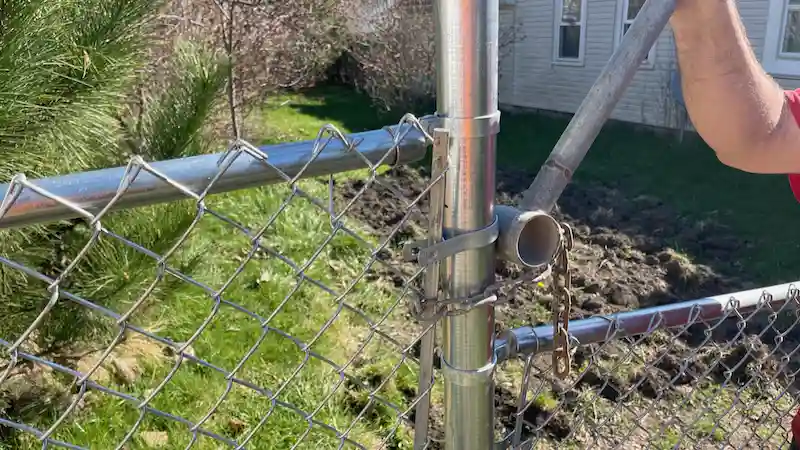
Installing a Chain Link Fence Gate
Almost every fence will have at least one gate to enter and exit. Chain link gates come in many different types. However, single swing gates and double swing gates are the most common when installing a chain link fence.
Single Chain Link Gates
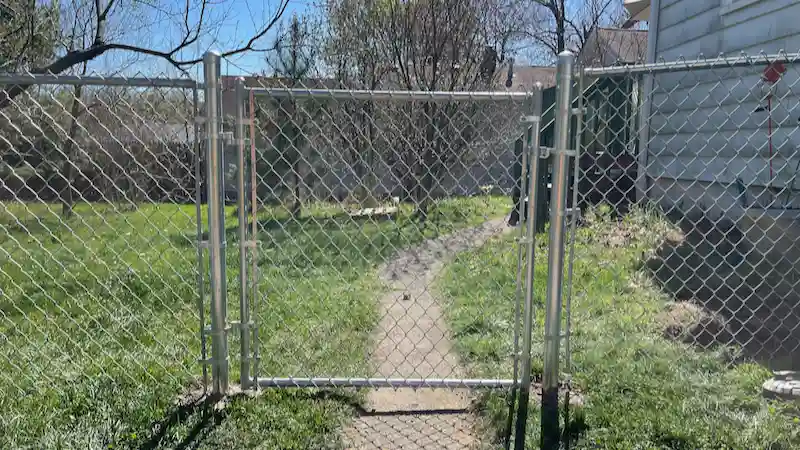
Installing a single leaf chain link gate is a relatively straightforward process. Start by installing the gate posts, which should be set in concrete to ensure stability.
Then, attach the gate frame to the hinge post using gate hinges, making sure that the gate is level and the hinges are evenly spaced.
Install a latch on the gate frame opposite the hinges. Test the gate to make sure that it swings open and closed smoothly and that the latch holds the gate securely in place.
Double Chain Link Gates
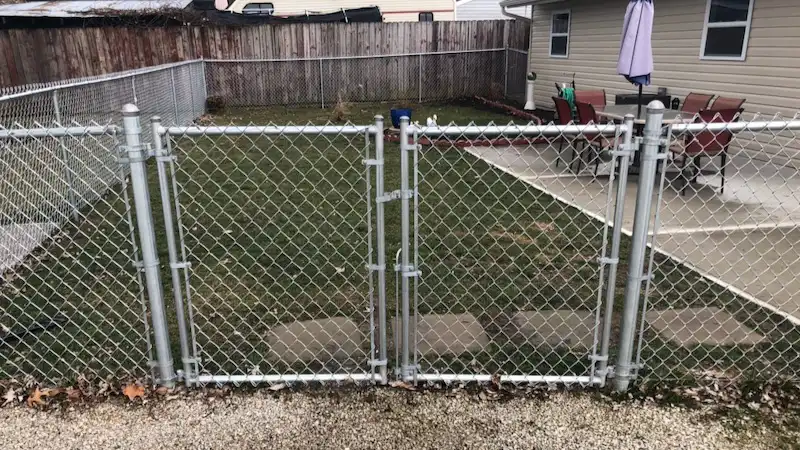
Installing a chain link fence double gate is a bit more complicated than installing a single gate, but the process is similar. Start by installing two gate posts, one on either side of the double gate opening, and set them in concrete.
Then, attach the gate frames to the posts using gate hinges, making sure that they are level and evenly spaced.
Finally, install a latch on one of the gate frames and a latch receiver on the other frame, making sure that they line up properly. Test the gate to make sure that both sides swing open and closed smoothly and that the latch holds the gate securely in place. A drop rod or cane bolt helps to keep the gate leafs in place.
Double chain link gates can be a bit trickier to install than single gates, but they provide a wider opening for larger vehicles or equipment.
Final Thoughts About Installing a Chain Link Fence
Installing a chain link fence on your own can be a rewarding and cost-effective way to enhance the security and privacy of your property.
By following the proper installation techniques and using the right tools and materials, you can create a durable and effective fence that will serve your needs for years to come.
Additionally, by installing the fence yourself, you can save money on installation costs and have the satisfaction of knowing that you completed the project with your own hands.
Whether you are looking to secure a residential or commercial property, installing a chain link fence can provide a reliable and low-maintenance solution that is both practical and aesthetically pleasing.
