
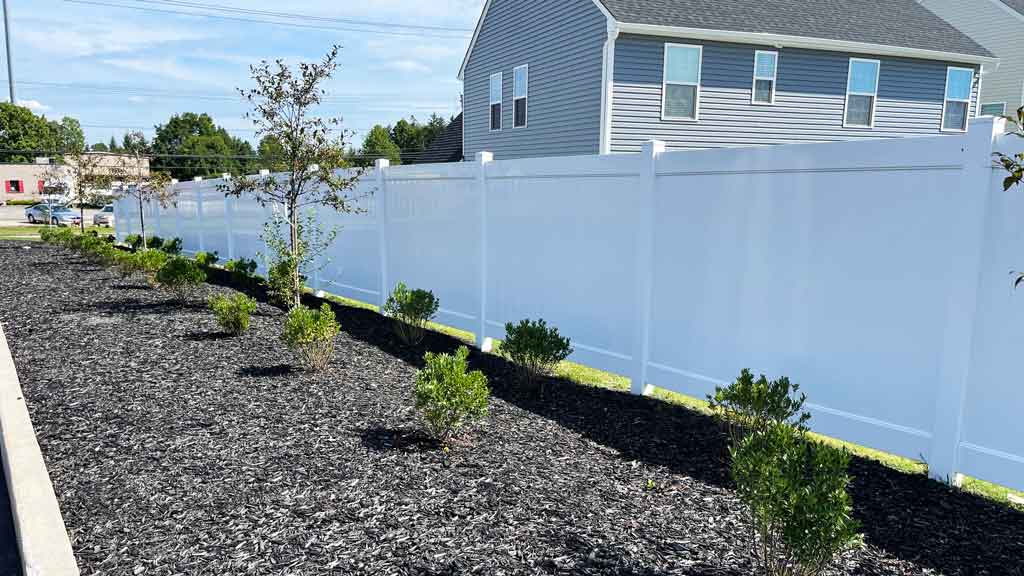
Installing a vinyl privacy fence will enhance any backyard. Not only are they beautiful, they’re also maintenance free. Providing years of trouble free security and privacy.
Vinyl privacy fence has made huge strides in the last decade. Offered in many styles, there are also many colors and textures that weren’t available just a short time ago.
As a result, homeowners now have the ability to choose styles and colors that accommodate their needs and surroundings.
Why You Should Buy a Vinyl Privacy Fence
Buying any fence is a big investment in your property. A vinyl privacy fence is an even larger investment. If you plan on moving in a year or two, I say save your money and go with wood.
However, for those of you planning on staying in the same location for longer, it might be just what your looking for.
Vinyl fence is popular because it is maintenance free. This means it will never rot or decay. It does not require painting or staining. Sealing it is not required either.
Another reason vinyl privacy fence is so popular is because it looks the same on both sides. Most building codes and fence inspections require that the good side of fences face outwards towards the neighbors.
Not a concern with vinyl privacy fence. Some homeowners associations even require it as opposed to wood fence. Knowing that no matter the homeowner, the fence will hold up for years and not become an eyesore.
It’s also easier to install than wood. The lighter weight of the materials combined with the way a vinyl privacy fence assembles together is much easier than building a wood fence. It require less tools too!
Vinyl Privacy Fence Colors and Textures
It wasn’t that long ago that vinyl privacy fences only came in white. Then tan and grey came along. Today there are many color options. There are even black vinyl fences.
Furthermore, there are even texture options offered by some manufacturers. However, as you might have guessed, anytime you choose a color other than white or a texture other than smooth, it drives the cost of the fence up.
Solid Colors

Solid colors consist of tans, greys and beiges. Each manufacturer will have their own names for the colors.
The components of the fence still have the same smooth look like a white vinyl fence, however, the darker colors soften the hard white wall look associated with the standard white fence.
Blended Colors
Some manufactured offer blended colors. This is when there are two or more colors added to the vinyl extrusion.
Blended color options blend in even better. Many times they are made to resemble wood grains. However, because the posts and sections are still smooth, they can still look shiny and reflect sunlight.
Textured Colors

Even more impressive are the manufactures that offer wood grain texture vinyl privacy fence. These styles of fences have darker colors combines with molded in texture to resemble wood.
The wood grain texture does a better job defusing sunlight than smooth fence. It also look more natural in wooded lots and yards. Or in neighborhoods with older architecture where homes don’t have vinyl siding and windows.
However, adding this option to your fence drives the cost up substantially.
Other Privacy Fence Options
For those of you who don’t want a solid 6′ tall wall around the perimeter of your backyard, you are in luck! There are options for your vinyl privacy fence other than completely solid.
Manufactures offer fence sections with accents or headers. This is when the top 12′ – 18″ of fence changes from solid, to something different.
Vinyl Privacy Fence with Lattice
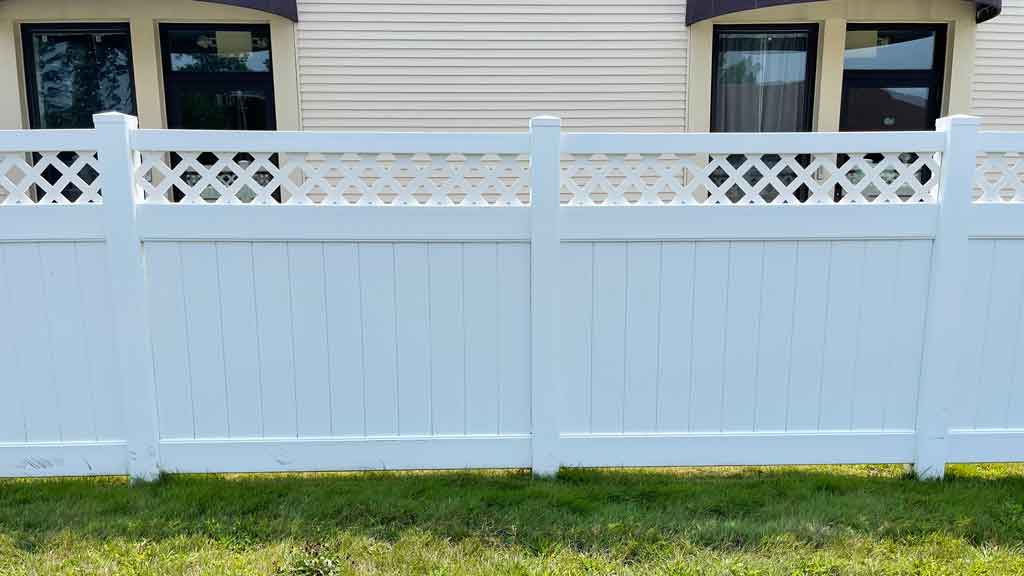
Lattice accents are very popular additions to vinyl privacy fence. The upper portion of the fence section will have either diagonal or square lattice.
This breaks up the hard lines of the top rail while also allowing in more light. However, while standard section of privacy fence can be racked to follow grade, sections with lattice accent or headers cannot.
Make sure the area the fence will be install in is flat and level when choosing these options.
Vinyl Privacy Fence with Picket Tops
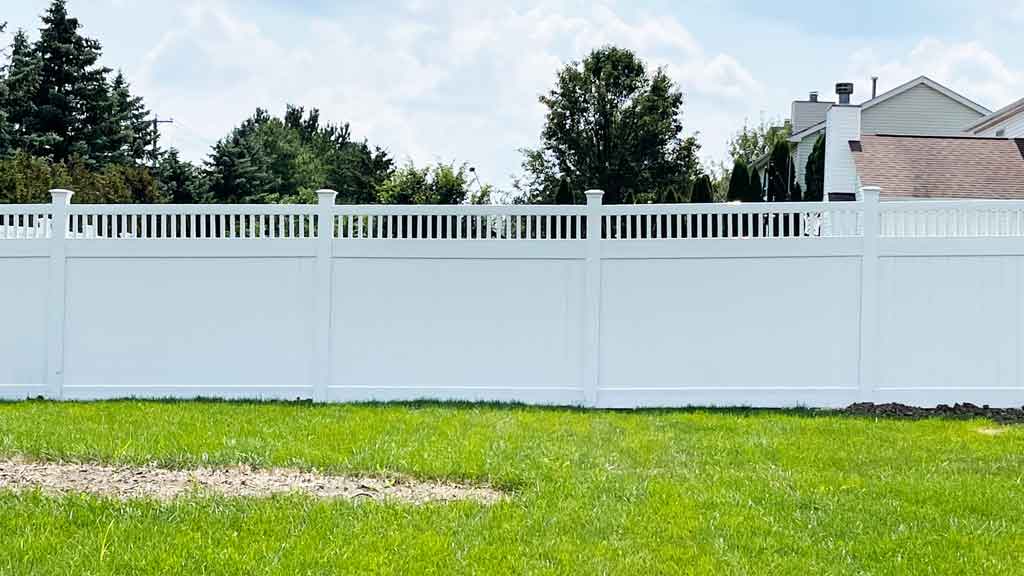
Another type of header or accent is a picket top. This is when the top portion of the fence section has a row of pickets.
Depending on the manufacturer, the picket can have pointed tops that extend through the upper most rail or have a more contemporary look with a flat upper most rail. Either style will let more light pass.
However, unlike lattice type headers, picket style headers do allow for the fence section to rack slightly to accommodate grade changes.
Vinyl Privacy Gates
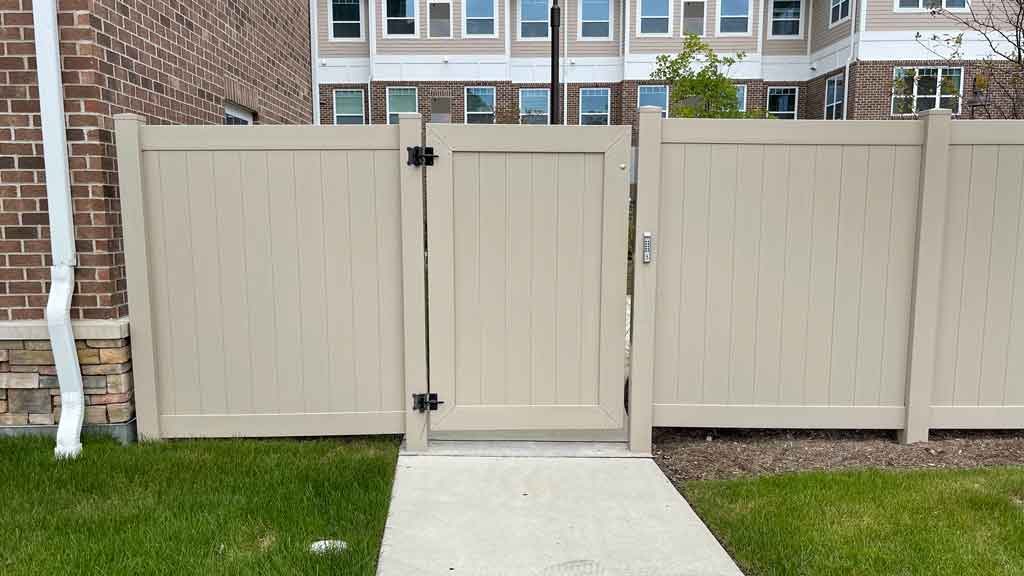
The gates for a vinyl privacy fence will match the style of fence. However, the gate posts are slightly different than standard end posts.
Vinyl posts are hollow. Left alone, they do not provide enough strength to support a gate or enough wall thickness for the gate hardware to bite into. As a result, aluminum posts reinforcements are installed inside of the gate posts.
The reinforcements provide the strength needed to support the gate while at the same time give the screws for the gate hinges and latches something to bite into the then the wall of the post.
Make sure to include post reinforcements in both the hinge and latch post.
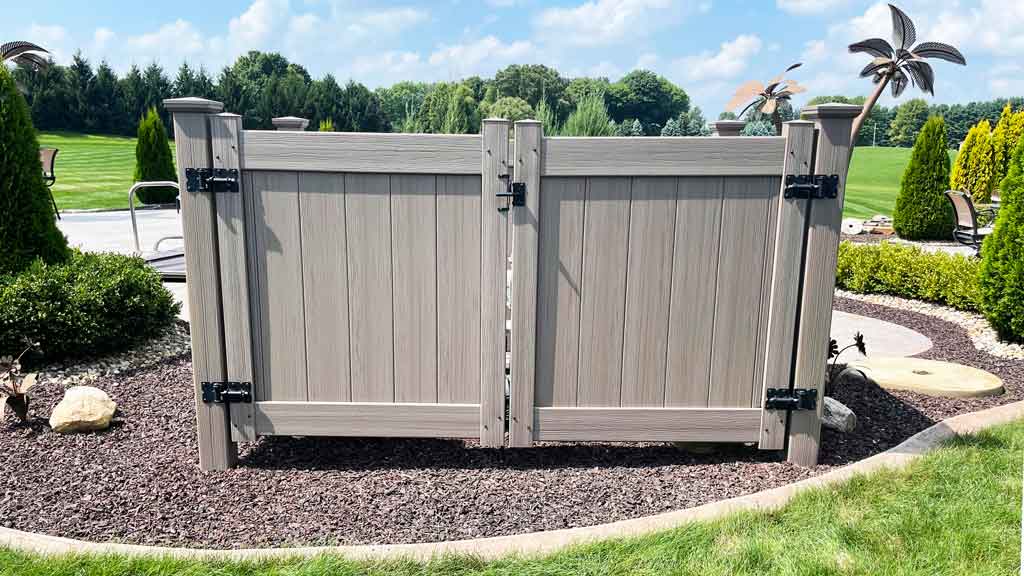
Gates come in 3′, 4′ an 5′ wide. Larger opening will use two single gates to form a double gates.
The construction of the gate will vary between manufactures. Some will have aluminum frames wrapped in vinyl while others have socket style gates.
Follow the manufactures directions for assembling and hanging vinyl gates.
Vinyl Privacy Fence Installation
Installing a vinyl privacy fence isn’t hard. While the exact process of installing one will vary by manufacture, for the most part, they are all the same.
The first step is setting the posts for the fence. The second step is assembling the sections, after the posts setup.
Vinyl Privacy Fence Post Installation

Setting the posts is the hardest part of installing a fence. However, if done correctly, it makes installing the rest of the fence easy. Vinyl posts are no different.
There are four types of posts. Routed to accept the rails of a section. An end post has holes on one side. A line post has holes on opposing sides. A corner post which has holes on adjacent sides. And a blank posts that doesn’t have any holes routed into it.
The distance between the posts will be specified by the vinyl privacy fence manufacturer. However, there is almost always going to be a shorter section in each fence line. This is ok.
Vinyl fence sections cut easily to allow shorter sections. Just don’t go larger than the specified opening.
Set the post in concrete footers. Set one post at a time and move onto the next. It’s a good idea to insert the bottom rails of the fence as you go.
Note: Most manufactures include an aluminum or galvanized steel channel on the bottom rails. The reinforcements support the weight of the fence sections and prevents sagging.
Installing bottom rails while setting posts, provides a visual of the distance the fence will be from the ground. Furthermore, it will allows you to get a visual indication of how the fence line will flow with the grade of the land.
After setting all of the posts in a line, go back to check for plumb and straightens before moving to the next line. Adjust any heights at this time.
A block of wood and a sledge hammer will drive high posts down. Pulling up in a post and allowing concrete to flow under it will raise low posts.
Installing Vinyl Privacy Fence Sections

Once the posts are dry it’s time to assemble the sections. This is the fun part. It goes quickly and is easy to do.
Now is the time to install the bottom rails, if not already installed while setting posts. Individual pickets make up the fill for a vinyl privacy fence section. They should be tongue and groove.
However, install the end channels before the pickets. Each section should include two end channels. End channels are “U” shaped pieces of vinyl that screw vertically to the posts, between the rails.
They allow for the pickets to move back and forth under normal expansion and contraction due to changing weather conditions. End channels also hide any gaps created by the posts set further apart than specified.
Once end channels are installed, it’s time to install the pickets. Start by inserting one into the bottom rail. Make sure it is pushed against the edge of a post and seated in the end channel. Follow that by installing the rest except for the last picket.
The last picket is installed from the top. Making sure to line up the tongue and groove with the opposing end in the end channel. Push the picket downward until it seats into place.

To install the top rail of the fence, insert one end into the top hole of a post. It is important to line the pickets up with the groove in the underside of the top rail before doing so.
The opposite end of the rail should point upward on a slight angle. Work the top of each picket into the rail while applying downward pressure. The top rail will lower closer into place with after each picket is installed.
To finish installing the section, pull the fence post over until it flexes enough to insert the loose end of the top rail. Repeat with the remainder of the sections and you’re done.
Pro Installation Tip
The rails on your vinyl privacy fence will have a notched end or a locking ring to hold the rail in place once installed. On cut sections, run a screw through the top of the rail through the hole in the top of the post before the post cap is installed. This will prevent the top rail from coming out.
